Showing posts with label gifts. Show all posts

Tuesday, December 24, 2013

DIY Girls Gift Exchange


My friends and I had another DIY gift exchange. The rules, you must make it and it must be under $10. You bring the number of gifts for the number of people that will be there, so in the end you get around 8 gifts if there were 8 people there. We did this last year and it was so fun seeing everyone's creativity! If you are looking for some quick inexpensive gifts to make, here’s some inspiration!


1. Vanilla extract

edit--4

Made with vodka and vanilla beans


2. Chalkboard frame

edit--2

Painted back of frame with chalkboard paint


3. Seashell airplant magnet

edit--3

Hot glued a magnet on seashell, added airplant


4. Mini canvas flower art

edit--5

Painted canvas, applied button and pieces of paper in flower design


5. Carmel corn in cute jar

edit--7

Made carmel corn, attached recipe and added gingerbread man


6. Natural potpourri

edit--6

This has orange, cranberry, and cinnamon to add to stove and simmer on Christmas morning


7. Infinity scarf

edit--8

Sewed an infinity scarf! I’m in love with this!


8. Burlap mason jar candle holder

This is what I made for my friends and I will give you a quick tutorial.

  • Clean out old jar, remove label, and if the expiration date is on the glass use a copper dish scrubber  and hot water to scrub off the numbers
  • Cut burlap to fit around the jar
  • Cut lace to fit around jar on top of burlap
  • Hot glue burlap and lace onto jar, be careful since burlap and lace has an open weave the glue easily comes through and can burn your fingers
  • Cut a piece of twine and tie it around the jar in a bow
  • Put a candle in the jar and you are done!

SONY DSC

SONY DSC

SONY DSC


Hope this gives you some creative ideas for those last minute gifts!

Sunday, December 22, 2013

Peterson’s Perspective DIY Holiday Roundup


Check out all my past posts on things to make for holiday gifts, cards, tags and decorating ideas.

Reindeer Beer

SONY DSC


Christmas card display

SONY DSC


Make your own holiday wreath


DIY ornament wreath


Christmas printable art

SONY DSC


Gold glitter deer artwork

SONY DSC


Easy holiday cards

                          SONY DSC


DIY gift bags, tags and cards


Handmade coasters


Customized Candles


Customized liquid hand soap and bath fizzies


Make your own soap


DIY gift tag roundup

Holiday 11 Gift Tags


DIY washi tape gift tags

SONY DSC


DIY gold polka dot vase

edit-4


I hope this gives you guys some last minute ideas! I love making gifts for people, I always have fun and it creates such a thoughtful gift. Happy holidays!

Tuesday, December 17, 2013

DIY Gift Tag Roundup


I have seen so many cute printable gift tags around the blog and pinterest world! Click the links below to download and print these super cute tags!

Printable_Chalkboard_Gift_Tags_Labels_Christmas

World Label


Creature Comforts Blog


Holiday 11 Gift Tags

Sass and Peril


Kelli Murray


In case you list my last post, here are my cute gift tags I made!

SONY DSC

Saturday, December 14, 2013

DIY Gift Tags


SONY DSC

I had a blast making these easy, inexpensive and adorable gift tags! I picked up some supplies at the craft store and gathered some existing craft stuff I had and went to work. These gift tags add such a personal touch on your presents and look 10 times cooler than traditional tags. I used two kinds of washi tape, stamps, glitter snowflakes, blank gift tags, and bakers twine. That’s all you need! With the Christmas stamps I had, I was able to mix it up and create different looks on the back of the gift tags.

SONY DSC

SONY DSC

SONY DSC

SONY DSC


Stay tuned for the gift tag round up I will be posting soon!

Sunday, December 1, 2013

Gold Glitter Deer Artwork


SONY DSC

I have seen several images floating around Pinterest showing gold deer or reindeer art and really wanted to make it. I already had a canvas, craft glue, a pencil, a paintbrush and cardstock. I stopped by Michaels and picked up some gold glitter and got to work. I found a deer image by Googling deer silhouette, then printed it out on some cardstock. I cut out the deer image and lightly traced it onto my canvas. I then used some “glitter glue” that came with a set I had to cover the entire area of the deer. Unfortunately there wasn’t quite enough, I should have added more craft glue but instead I applied the glitter. I was sadly disappointed when awhile later I took the glitter off and I had all these empty spots. My biggest suggestion is to thoroughly cover the area with an even coat of glue. I continued adding glue to the empty spots and applying more glitter. I had to go through this several times and then my lovely boyfriend decided he wanted to help and add eyes and a mouth to it. Really?! This just caused nice clumps on it. Finally I applied a thorough and even coat of glue to the entire thing and coated it with glitter. I let the glitter sit in place for awhile to really get adhered. When I finally shook the glitter off I had my complete gold glitter deer art work. It turned out to take way longer than it should have but I love the result!

SONY DSC

SONY DSC

SONY DSC

SONY DSC

I think this project would be pretty cute to do with any silhouette. If you wanted to create a holiday one you could do an ornament, tree, snowflakes, gifts, a bow, etc. Have fun crafting and glittering!

PS Glitter has been banned from the house now after this project!

Monday, August 12, 2013

Bride and Groom Mugs


One of my best friends recently got married to the love of her life. I was very involved in planning her shower and bachelorette party and wanted to share some of those details with you guys. Today, I am going to show you a quick and easy gift that I made. You can do the same thing or come up with your own plan for a gift! Originally I saw a mug on Pinterest that said “He loves strong coffee” and “she loves green tea” I loved the idea and wanted to personalize it as my friends loves hot chocolate, unfortunately her man is not a coffee or tea drinker but a hot chocolate drinker as well so it just didn’t work. So I did a MR. and MRS. set and a BRIDE and GROOM set. They absolutely loved them! I had seen this idea done many times, but I followed these directions. Here is how to make them:
1. Pick up some plain white mugs and make sure they are clean
2. Create your design and draw it on using a sharpie marker
3. Put the mugs on a cookie sheet and put in the oven on 350 degrees for 30 minutes. This will set the design, however I have read that you should hand wash these as sometimes it will come off in the dishwasher.
edit--3
edit--2
edit--5
Now it’s your turn to get DIY’ing!

Sunday, January 22, 2012

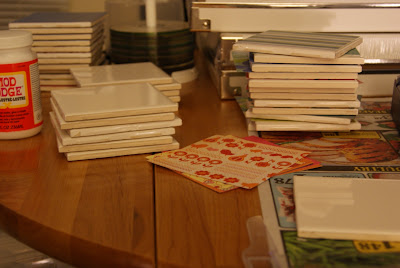
Handmade Coasters

Awhile ago I came across this cute and simple gift idea. Handmade coasters! I decided it was such a good idea I would make them for christmas gifts! They turned out super cute and everyone loved them!

At the hardware store: First buy 4 x 4 white tiles at Lowes or Home Depot, the cheapest kind available will work fine. I purchased mine for 16 cents each! Also you can buy felt feet here like those you would put on furniture, only smaller. You will stick these onto the bottom of the tiles so it doesn't scratch your table tops. The last thing you will need there is a clear spraypaint sealant.

At the craft store: purchase modge podge, scrapbook paper in whatever print you would like ( I choose paper/colors that reminded me of the person), a foam paint brush, a paper cutter if you don't have one, and ribbon or rafia to tie around the tiles.

At home: gather a pencil, ruler and newspaper.

1. Measure the exact size of the tile, then measure it out on the backside of your scrapbook paper. Cut the scrapbook paper to the exact size of the tile. Line up the paper on the tile to make sure if fits precisely. Repeat this as many times as necessary.


2. Lay out newspaper to protect your workspace. Apply modge podge with the foam paint brush onto the tile, then carefully lay down the paper making sure there are no wrinkles, then apply another layer of modge podge ontop of the paper. Set aside to dry. Continue doing this to all of the tiles. Do not set them on top of each other while they are drying as they will stick and pull off some of the paper, I learned this the hard way.


3. Go outside and lay all the tiles out on newspaper. Follow the directions on the spray paint and apply a few clear coats to seal the paper. Let dry.

4. When the tiles are dry you can stick on the felt feet, one in each corner. Then I stacked together the four tiles that went with one another and tied them together with rafia.


See I told you it was simple! The best part is this is an inexpensive and thoughtful gift.

Tuesday, November 22, 2011

Handmade Christmas tags

I love handmade gifts they give such a personal touch. Better homes and gardens shows these tags made out of shipping tags. They are available at office max and the tags we use at hip! I'm sure there are lots of other creative tags you can make with them!

Friday, April 1, 2011

Bath Fizzies

 Thanks to Martha Stewart, I was able to get a recipe for bath fizzies for Christmas presents! You need the following ingrediants:

1/2 cup citric acid ( I found at a vitamin shop)
1 cup baking soda
3/4 cup cornstarch
1/4 organic cane sugar
about 6 drops food coloring
ice cube silicone trays or other silicone trays (I used mini brownie bite trays)
container to put the fizzies in
10-15 drops essential oil
travel size spray bottle
glass measuring cup
mixing bowl
flour sifter


First, stir together the citric acid, baking soda and cornstarch. Pass the mixture though a flour sifter.Stir in sugar.


 Fill the spray bottle with water and 6 drops of food coloring. Spritz mixture lightly so it is damp but not fizzy. You want to be able to pack the mixture. Add essential oil one drop at a time until it is to your desired scent. Mix the mixture with a spoon or your hands until the color is well distributed. As it drys out spray more water on it.


 Pack mixture into trays. 


Let mixture dry overnight in the forms. Gently pop cubes out of tray. Transfer to jars and label. Be sure to keep the scents in seperate jars so they do not mix.

 
Give bath fizzies as gifts or enjoy for yourself! Use two cubes per bath.