Monday, September 10, 2012

Adorable Bachelorette Gift


One of my best friends recently got married. I wanted to make her bachelorette party super fun and had to give her a few gifts! I have seen cute undies with the brides future last name on the butt, but found they were quite spendy, so I got crafty! I picked up some iron on rhinestone letters, a pair of inexpensive undies and a tank and got to work! Gather your iron, tank, undies and the rhinestone letters and follow the instructions. The basic instructions I followed was to cut out the letters, remove the backing, place on item in the arrangement you want, then turn the garment inside out and begin ironing over the letters. Once again, follow the instructions so you don’t iron too long or too little. When you are done allow the item to cool, then turn correct side out and make sure all the rhinestones are applied securely. Ta Da! You are done and have now created an adorable, personal gift for a close friend!


SONY DSC


St Johns Bridge 010


SONY DSC

SONY DSC

SONY DSC

Blue Skies

Portland can be so beautiful when the weather is right! Lately I have been having a blast taking photos with my nice camera. Unfortunately, there are lots of photo opportunities when I don’t have my camera. Luckily, I have an Iphone 4s with a really amazing camera. That + instagram creates some pretty cool photos! I love it! Below are a few photos I took back in spring. I am looking forward to going back here with my nice camera, because it is just gorgeous!

Iphone Photos 351Iphone Photos 352

Iphone Photos 353

What cool places have you found to photograph in Portland? I would love some more ideas!

Thursday, August 30, 2012

New Beauty Products!

Today was a whirlwind at work and not in the good way. The phone wouldn't stop ringing, papers were scattered everywhere and there was lots of stuff to deal with. It was quite overwhelming. But, I got to do something fun after work and visit my brothers work Blush Beauty Bar. This store is quite amazing if you have never been. But it is very hard to resist indulging in their amazing products! I got lucky and got a few gifts from my brother! New Stila foundation, which includes a concealer on the top and a brush. I also got a new stila stay all day liquid lipstick! Then i invested in a very popular product called the beauty blender. It is an egg shaped sponge that is suppose to make applying foundation flawless and super easy! The best part is its reusable and can be cleaned! Can't wait to try out my new products!

photography by Kristen Peterson.

Sunday, June 24, 2012

Design Star

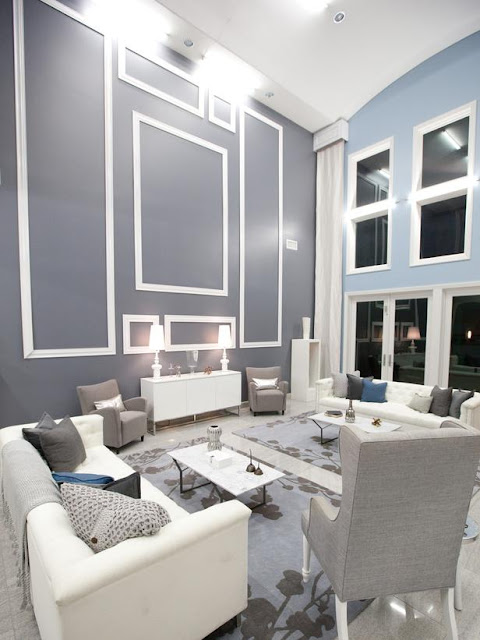
So I always enjoy watching Design Star on HGTV and just kinda forgot about it this year! Luckily it is available on on demand so I watched the first two episodes. In the first episode my favorite spaces were Danielle and Luca's. I love love love the room! The beautiful gray blue color, the molding used on the walls to create architectural detail and the contemporary furniture.


I also love how Brittany created interest on the wall in a bedroom by adding fretwork. She had a carpenter cut out the pieces from mdf, painted them white and adhered them to the wall. It really makes an impact!


In the second episode it was the white box challenge! The catch this year was the white rooms were in the middle of Union Station, a very busy train station in LA! They had to purchase everything at a home and garden store so creativity was a must!

I love the chain link chandelier Brittany made!

Bex had some very cool creative ideas. She took this copper disk and painted a silhouette on it, then embellished it with hot gluing pennies around it. She also created interest by cutting PVC pipes and grouping them together. 


Rachel's room really impressed me with her use of patterns. I loved the graphic wall she created. I cannot believe she did that by hand and it turned out so perfect! Unfortunately this photos doesn't show the room as well as it appeared on tv. I also loved her fashionable drawing, so cute!


Danielle wants again showed how good of a designer she is. So far she is my favorite! She took inspiration from a photo of her mother to create this awesome graphic on the wall! She also completely transformed the sofa! This also doesn't show as well in the photo as it did on tv. I have to agree with the judges though, that horrible torchiere really needed to be pulled!


All photos from hgtv.com

Have you been watching design star this season? Are there any other design shows your recommend? I really want to start watching more of them! Hope you all enjoy your weekend! 

Monday, June 18, 2012

Colorful, geometric wonder wall

One of my good friends is getting married in a month and I can't hardly wait! She asked me to be her maid of honor and I was so delighted! I recently visited her in Corvallis and went over some wedding details. Today, I was perusing a Martha Stewart Wedding magazine and found a very cool geometric wall. I think this would be cool to do in a lot of different places; retail shops, parties, offices, or even your home! Its a great, inexpensive statement piece. 


This simple project just involves cutting and folding paper! For detailed instructions visit Martha Stewart.

Sunday, June 17, 2012

Recipe Review: Stir Fry


 I found this great recipe from AllRecipes.com I love that this recipe incorporates vegetables, I have been working on eating better and having more vegetables and fruits (if you know me you know I am very picky and not so healthy of an eater).

First take a look in your fridge and pantry for ingredients and then take a trip to the store for the remaining items:
½ cup chicken broth
1/3 cup soy sauce
¼ cup white wine or additional chicken broth (I used broth)
2 garlic cloves minced
¼ teaspoon ground ginger (I found fresh ginger root for 99 cents at Grocery Outlet)
¼ teaspoon pepper
1/8 teaspoon crushed red pepper flakes
¾ pound skinless boneless chicken breast halves, cut into strips
4 teaspoons canola oil
2 cups broccoli florets
2 cups julienned carrots
2 cups shredded Chinese or napa cabbage
1 cup fresh or frozen snow peas cut into 1 inch pieces
A handful of scallions
6 ounces spaghetti or chow mien noodles
2 teaspoons cornstarch

After gathering all the ingredients together, combine the first seven ingredients to make your marinade. Set aside ¾ cup of this mix for later.


Put the chicken (in strips or chunks) in a large ziplock bag and pour in the marinade. Mix the marinade so it coats all pieces. Refrigerate for 30 minutes.


After a half an hour, remove the bag and pour out the marinade. Add the chicken to a large nonstick skillet or wok with 2 teaspoons of oil. Cook for 3-5 minutes or until no longer pink. Remove and keep warm.


Stir fry the broccoli and carrots in the remaining oil for 6 minutes. I broke the broccoli into really small pieces to help it mix in a little better. Add cabbage and peas and continue cooking for three minutes longer or until the veggies or crisp tender. Meanwhile cook the pasta according to directions. I used chow mien and cooked for 3 minutes then drained.


Combine cornstarch and remaining marinade you set aside, stir until smooth. Add to the vegetable mixture and bring to a boil. Cook and stir for 2 minutes or until sauce thickens. After draining pasta, pour into vegetable mixture and stir. Add some chopped scallions if you like. Return chicken to the pan, stir and heat until warm.


 The meal was delicious! I loved the marinade. The vegetables were a bit hard to swallow though, but at least I got a few nutrients J Also, I enjoyed using my new vintage apron from Sur la Table! Isn’t it adorable?


 I hope you enjoyed this recipe review! Any new recipes you have tried lately? 

Wednesday, June 13, 2012

Quick and easy pork loins

Are you ready for a very easy and healthy dinner? I hadn't had pork in a while and remember always enjoying barbecued pork when I was younger so I asked my mom what she did to season it and it was so simple: garlic powder and Lawry's seasoning salt! So I bought three small organic pork loins. Pork is a bit expensive but the difference between organic and non organic was very minimal so it was easy to make the right choice! I sprinkled on some garlic powder, Lawry's seasoning salt and a bit of pepper around all the edges of the meat. I then barbecued it on medium heat until it was seared on one side, flipped it and seared the other side, then I cut into it to make sure it was done since I don't have a thermometer. The best part of pork is it has very low fat in it! I served it with a side of salad and garlic cheese bread! I didn't take a photo as I didn't intend on blogging about it, but I thought I would share this easy meal for those looking for dinner in a pinch! 

Wednesday, May 23, 2012

Recipe Review: Muddy Buddies

I was first introduced to this thing called muddy buddies by a dear friend of mine back in high school. I had never heard of such a thing or tried them, but after I did, I was in love with this sweet treat! I got the urge to make some muddy buddies, so I found the recipe, got the ingredients and whipped it up!

Gather your ingredients:
9 cups of any Chex brand cereal, I used Corn Chex
1 cup semisweet chocolate chips
1/2 cup peanut butter
1/4 cup butter
1 teaspoon vanilla
1 1/2 cups powdered sugar


1. Pour 9 cups of chex cereal into a large bowl
2. In a microwaveable bowl combine chocolate chips, peanut butter and butter


3. Microwave for 1 minute. Stir. Microwave another 30 seconds or until mixture stirs smooth. This time greatly depends on the power of your microwave
4. Add 1 teaspoon vanilla to mixture and stir well
5. Pour the mixture over the cereal in the bowl and stir well until all pieces are evenly coated


6. Pour the mixture into two gallon size Ziploc bags, splitting evenly
7. Add 3/4 cup powdered sugar into each Ziploc bag
8. Seal the bag well then shake until all the pieces are evenly coated in the powder

(grr this won't upload the correct direction!)

9. Remove from bag and store in airtight container. You don't want to leave it in the same bags as they have chocolate and powder all over them!
Enjoy your treats! They are seriously delicious!

Recipe adapted from Betty Crocker


What have you been making lately? Any recipes you suggest I try or want me to review? I would love your suggestions!

Wednesday, May 9, 2012

Look what I received in the mail!

I love receiving samples in the mail! The other day I received two exciting things!

The Target makeup bag- no longer available
It included a cute striped cosmetic bag, patene shampoo, nivea lotion, simple cleansing clothes, neutrogena visibly bright face wash, loreal magic lumi and a booklet of cosmetic coupons for target!


The other thing I received was scrapbooking goodies from Craft Warehouse! On facebook they had several giveaways, I only caught one and just commented that I wanted to win and I did! They had me email my address and a few days later I received all of this!


I am loving the glitter ribbon! I have to figure out some fun projects to do with it! I think it would make some pretty cute headbands!

What is the coolest thing you have received in the mail?

Monday, April 30, 2012

Deep Cleaning

So i'm not going to say I love cleaning, because I don't. What I do love is the feeling after cleaning, knowing that everything is clean and sanitary. Since it is spring cleaning time, I have seen quite a few ideas on cleaning. The other night I cleaned the microwave, the dishwasher, the kitchen sink disposal and the washing machine. Some of you may be thinking I'm crazy but the dishwasher and washing machine really do need to be cleaned out. At my apartment there seems to be really hard water and I tend to have problems with the soap sticking on my dishes, what a pain! I have had this worked on once before and ran through a cleaning solution. The problem has reappeared but I think I may have found a solution! I love all of these cleaning recipes because they use inexpensive and earth friendly products: baking soda and white vinegar!

Sink Disposal
Directions found here
1. Pour 1 cup of baking soda in the drain
2. Pour 1/2 cup of vinegar in the drain and cover with a plate to plug the drain so it can do its work
3. Let it sit and work for 30 minutes. Do not use the sink during this time.
4. Remove the plate and run hot water through the pipes for 2-3 minutes.
5. If it is clogged really bad you may need to repeat. Doing this once a month keeps the drains clear and fresh.


Dishwasher
Thorough instructions found here

1. Start with a freshly ran dishwasher with no dishes in it
2. Clean around the seal with a baking sofa paste, then go over it with the toothbrush dipped in vinegar. Scrub around the seal and any other spots you can find stuck on dishwashing detergent, for me there was a lot stuck around the detergent dispenser.
3. Add two cups of vinegar to the bottom of the dishwasher (with nothing else in it) and run on a energy saving or low wash. If possible stop the machine in the middle of the wash and let the vinegar set in the bottom to work for about 20 minutes then finish the wash. If you have mold and mildew problems you can run through 1/2-1 cup of bleach, but don't do this if you have a stainless steel interior.
4. Clean the front of the dishwasher including the buttons and handle with an antibacterial cleaner.

Microwave
Original instructions found here

1. Place water and a splash of vinegar in a microwave proof bowl.
2. Put it in the microwave and microwave for five minutes
3. While it is cooking clean off the outside with an antibacterial spray
4. Once it is done let it sit for a few minutes for the steam to further work away the gunk. Then very carefully remove the bowl as it is very hot, I used oven mitts.
5. Begin wiping down the walls with nothing but a rag or paper towel. Remove the plate and wash it in the sink with hot soapy water.

Washing Machine (front loading)
Original and full instructions here

Mine wasn't very dirty so I didn't have to do all the steps the original source provided. However, I do always leave the door open for awhile after washing to let it air out and dry. Front loading washers get stinky and moldy if you don't do this!

1. Add one cup of baking soda and one cup of white vinegar into the soap dispenser.
2. Add one cup of baking soda and one cup of white vinegar into the actual washer. (When these ingredients combine they fizz up, don't be alarmed this is part of the process).
3. Run a quick wash on hot.
4. When the cycle ends wipe down all surfaces inside to get all the water off, then wipe out the plastic lip, this is where soap, lint, hair and grime get caught and needs to be wiped down regularly.

Always always use high efficiency detergent or if using regular detergent only use half the recommended amount.


·       
Now you're done! Pretty easy huh?
Have you been doing lots of spring cleaning lately? What are your favorite products or tips for getting your home clean?